Arduino Pro
The Arduino Pro is intended for advanced users who require flexibility and low-cost. It comes with the minimum of components (no on-board USB or pin headers) to keep the cost down. It's a good choice for a board you want to leave embedded in a project. Please note that there are multiple variants of the board which operate at different voltages and clock speeds. You need to know if you have the 3.3V / 8 MHz version or the 5V / 16 MHz version.
Uploading Sketches
The board comes without built-in USB circuitry, so an off-board USB-to-TTL serial convertor must be used to upload sketches. For the 3.3V Arduino Pro boards, this can be a FTDI TTL-232R-3V3 USB - TTL Level Serial Converter Cable or the SparkFun FTDI Basic Breakout Board (3.3V). For the 5V Arduino Pro boards, use a TTL-232R USB - TTL Level Serial Converter or the SparkFun FTDI Basic Breakout Board (5V). (You can probably also get away with using a 5V USB-to-serial convertor with a 3.3V board and vice-versa, but it's not recommended.)
If using the FTDI cable on Windows, you'll need to make one configuration change to enable the auto-reset. With the board connected, open the Device Manager (in Control Panels >> System >> Hardware), and find the USB Serial Port under Ports. Right-click and select properties, then go to Port Settings >> Advanced and check Set RTS on Close under Miscellaneous Options.
For the 3.3V versions of the Arduino Pro, select Arduino Pro or Pro Mini (3.3V, 8 MHz) w/ ATmega328 or Arduino Pro or Pro Mini (3.3V, 8 MHz) w/ ATmega168 from the Tools >> Board menu (depending on the microcontroller on your board). For the 5V versions of the Arduino Pro, select Arduino Duemilanove or Nano w/ ATmega328 or Arduino Diecimila, Duemilanove, or Nano w/ ATmega168.

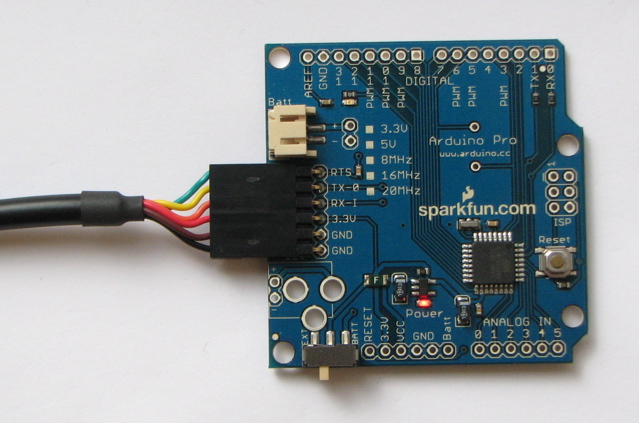
An Arduino Pro connected to (and powered by) an FTDI USB - TTL Level Serial Converter Cable. The green and yellow wires align with the words "green" and "yellow" written underneath the pins.

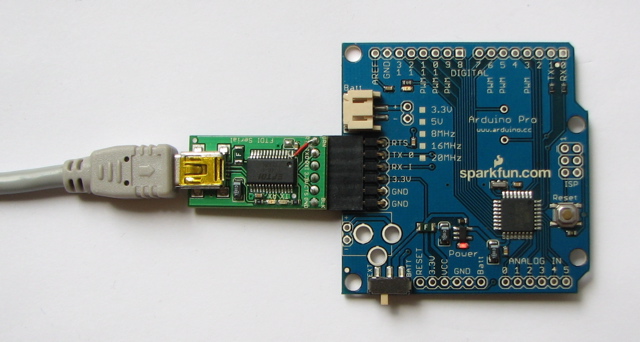
The Arduino Pro connected to (and powered by) a SparkFun FTDI Basic Breakout Board (prototype version) and USB Mini-B cable.
Power
The external USB-to-TTL serial convertor will power the Arduino Pro, regardless of the position of the switch. To use the board standalone, with no connection to a computer, it can be be powered by a battery or an external power supply (wall wart). You can solder the + and - wires of a battery connector to the corresponding holes on the board. For the 3.3V boards, you can connect a LiPo battery (with JST connector) to the JST jack. Alternatively, solder a DC power jack into the three large holes on the board, and connect a DC power supply (center positive). When the switch is in the "Batt" position, the board will draw power from an attached battery; when it is in the "Ext." position, power comes from an external power supply. In either position, the board can be powered by the 6-pin USB header.

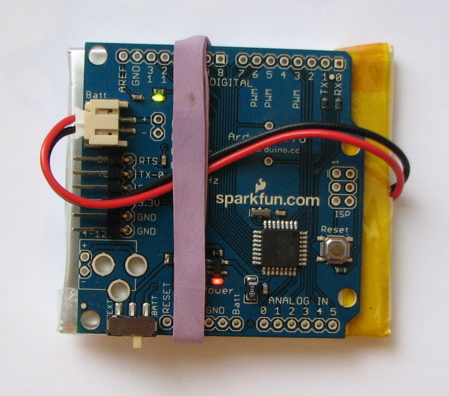
A 3.3V Arduino Pro powered by a
2000 mAh LiPo battery from SparkFun.Connectors
Any standard 0.1" spaced header can be soldered to the holes on Arduino Pro. use every pin requires two 6-pin and 8-pin headers. Bare wire also directly holes. Note that spacing is compatible with shields. >
2000 mAh LiPo battery from SparkFun.
Connectors
Any standard 0.1" spaced header can be soldered to the holes on Arduino Pro. use every pin requires two 6-pin and 8-pin headers. Bare wire also directly holes. Note that spacing is compatible with shields. >The text of the Arduino getting started guide is licensed under a Creative Commons Attribution-ShareAlike 3.0 License. Code samples in the guide are released into the public domain.